If you can’t find what you want…

…make it!  I’m a DIY kind of girl, always have been. I’m frugal, and learned many skills from my mom; ours was a big family with a limited income, she made do, did a lot of the projects around the house, figured out how to fix things herself. I still tend to do things myself rather than pay someone to do it. Last weekend, I tore the mantle and fireplace surround (with trim all the way to the high ceiling) off my fireplace by myself rather than pay the contractor to do it. Last Fall, when I moved, I wanted a jewelry case to hang in my walk-in closet, that would protect my silver pieces from tarnishing. There are lots on the market, but they were not for my frugal self. And, I decided I didn’t need a large one.

So, I went to Hobby Lobby, bought a 10″ x 20″ shadow box frame, and pulled out the poorly installed canvas backing. I couldn’t find a white frame, so I bought a black one and spray painted it with white enamel that I happened to have on hand. I didn’t take the glass out, I just very carefully taped newspaper over both sides of the glass.

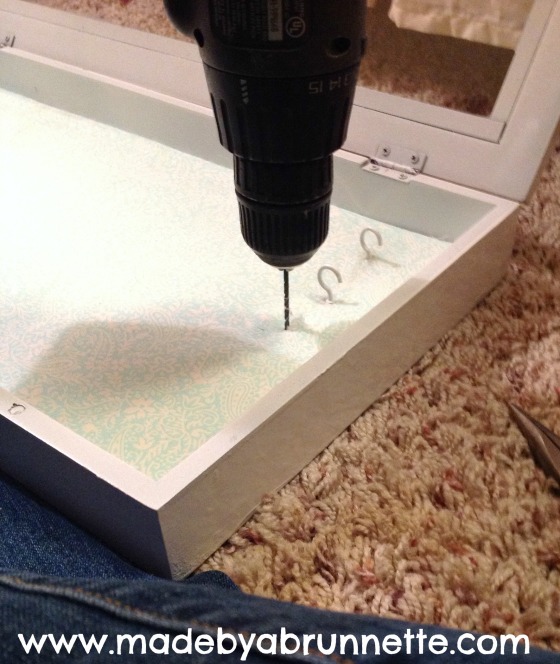
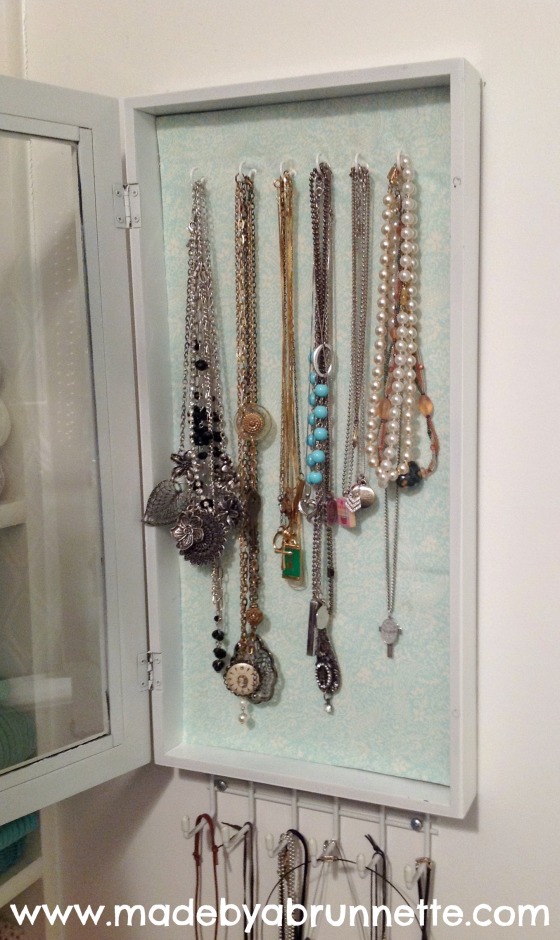
Cut a piece of mat board to fit, and covered that in batting and fabric to match my paint color:JewelryCase1 First, folded in and glued the batting…JewelryCase2 Then did the same with the fabric. The front side looked like this when I was done:JewelryCase3 I glued this into the bottom/back of the shadow box, then drilled holes for cup hooks that I had also spray painted white. (If I were to do this again, I would have used an awl to make my pilot holes–the drill bit got wrapped in batting each time and was a bit of a pain):JewelryCase4 Once the cup hooks were all screwed in:JewelryCase5 And voila! The finished project hanging on the wall of my closet:

JewelryCase6 The wire rack below it is what I have used for years for my necklaces/chains, but anything silver always tarnished quickly hanging out in the open air. Really, a fairly easy project that cost me about $22 total. JewelryCase7Now to get that fireplace surround re-done…

Happy creating,

Doris

The garden that took a long time to grow.

This quilt is another 2014 finish I have yet to blog about, but it was started waayyyyyy before 2014. I bought the fabric to make my niece a quilt when she was 8-9 months old (May 2012). Here she is at my mom’s house, lovin’ on the fabric:

ZoeFabric

There is another shot taken just before this one where she is sitting up looking at the camera with a big cheesy grin. Then she just kept snuggling the fabric on the floor. Yep, I completely understand, Z–I feel the same way about new fabric.

I started cutting hexagons for her quilt in July 2012 at my Gruber’s retreat in Minnesota using a friend’s Go! Cutter and this die I bought:GoCutterHexagon

I only cut the large hexagon, not the two smaller sizes.

In the meantime, I had used some of the fabric I bought to make Z this sweet pillow for her 1st birthday using our One Big Cabin owl applique, and I made a matching valance for her new bedroom… y’know, to match the quilt she didn’t yet have. 😉

I didn’t really have a pattern in mind when I started cutting hexagons, but shortly after that retreat, I came across Terry Atkinson’s Hexie Garden pattern, and I knew that was meant to be Z’s quilt.

I worked on it at a few more retreats, and naturally, adapted the pattern a bit (because I have a hard time sticking to a pattern), added a double border, and eventually had it ready to gift to her for her 3rd birthday last August. It’s twin size, perfect since she was moved to a big girl bed that very same week:

ZoeQuilt1

The center of the hexagon flowers are a light grey print from Sunkissed by Sweetwater for Moda, the purple triangles are Tiny Diamonds by Dear Stella, and the flower “petals” all came from my scrap bin, mostly scraps from my Candied Hexagon quilt.

ZoeQuilt2

ZoeQuilt3

ZoeQuilt4

The quilting is a computerized Innova design, and includes butterflies, flowers, dragonflies, bumblebees… truly perfect for this quilt, and this sweet girly-girl.

ZoeQuilt5

I used leftovers on the back, leftovers from the valance and pillow, and the front of the quilt, and a few coordinating pieces from my stash.

ZoeQuiltBack

One of my favorites is this Valentine print, tiny X’s and O’s with little hearts hanging inside each O:

ZoeQuiltBackDetail

Z is the child I believe should have been named Joy, because she is THE poster child for living a joy-filled life. She’s kind of a party waiting to happen, very sweet and kind, almost always smiling and enjoying herself. I hope she stays that way, always.

Zoe&HerQuiltThat’s her on birthday #3, when I gifted her the quilt. She gets lots of goodies from Aunt Doris, handmade and purchased–it doesn’t hurt that she knows how to melt her auntie’s heart.

Happy Quilting,

Doris

Sometimes late is better than never…

In early 2014, Lynne put out a call for a challenge to be published in Fat Quarterly magazine (Issue #17, late Spring 2014) using mini-charms from Moda. I emailed her my idea, and she sent me two mini-charm packs of Zen Chic’s Sphere collection. She mailed them from England, they were returned to her once, and re-sent, and finally, weeks later they arrived in Iowa! But then, my life fell apart, cancer took my husband’s life — and for a very long time I didn’t even know which way was up.

Lynne was of course very understanding that my project wasn’t completed in time for the publication. But I was determined to finish it. In the meantime, my Mom and I had made an impromptu stop at Ikea and I found a table runner that SCREAMED Spring, and just happened to be the exact same colors as Brigitte’s Sphere fabric collection. So I scrapped the original idea I had proposed to Lynne, and started making small half-square triangles and randomly piecing mini charms and HSTs together in two long strips.

I appliqued the strips onto the long edges of the Ikea table runner, leaving about an inch of the white background visible along each edge:

TableRunner2

I didn’t want a dark binding to take away from the bright colors, or draw the eye away from the floral center, so I made a faux-flange binding using a Moda blue floral print from my stash with a white binding.TableRunner3

Here it is displayed (LAST MAY!) on the built in buffet in my old house:

TableRunnerI don’t live in the home with the pretty built-in anymore, but I still have my beautiful quarter-sawn oak antique table, and this runner and it’s bright Spring colors still look great and make me feel happy. Not sure why it took me 11 months to get this project on the blog; I finished it at the end of May… I think it just fell through the cracks.

Late is, indeed, better than never.

Happy sewing,

Doris

Home Sewing

I learned to sew around age ten, and I started with clothing. My mom sewed all of my Dad’s shirts, most of my sister and my clothes, and many of my three brother’s shirts. She also re-upholstered furniture, made curtains, made doll clothing, did mending and alterations for friends and neighbors, made I-don’t-know-how-many plaid uniform skirts for girls from our grade school and our high school… and I picked up her love of all things textile early on.  I begged to go along to the fabric shop with her, and picked out patterns and fabric before I ever learned to make things myself.

Funny, though, my sister never had any interest; still doesn’t. As my sister says, “why do I need to know how to sew, if I need something done, I can just ask you or Mom.” She has a good point. It’s not like we’ve ever said no to her.

This week I made a valance for her youngest, my sweetie pie niece, Zoe Grace. She’s the doll I made the owl pillow for, and there is a quilt in the works to match the valance and pillow.

Valance Detail on Instagram

Click on the photo above to see a clearer larger version on Instagram, I added the hugs and kisses fussy cut detail to set it off!  The walls are a very pretty turquoise color, and I had a tough time getting a good pic with my iPhone, but you sort of get the idea…

Valance on Wall ruffled girly valance

She has a butterfly garland on order for the walls, and other butterfly decor plans.  And these curtain rod finials are just too cute!

Valance Detail Hugs and Kisses

 I can’t talk her momma into it, but maybe I’ll get lucky and Zoe Grace will want to learn how to sew one day!

June has been a bust month for our chapter of the Modern Quilt Guild… my house was one of the drop off points for entries to go into our first local Modern Quilt show!  On the 15th, my husband and I drove to Ames with the entries and met up with Jill of Modern Quilt Relish, and Greta, the curator at the gallery.  Two hours later, we had the show hung!

Quilt Show installation

Quilt Show Installation 2

This last Sunday evening we had an artist’s reception, and several of us collaborated to give an impromptu Gallery Talk with Q&A.  We were incredibly pleased to have such a good turn out to our gallery opening!

MQG Quilt Show Reception

One of my two entries is the blue and yellow Row House Creations Fox in a Box quilt shown here, next to a “clothesline” display of mug rugs and my friend Emma’s fun “piece, love, quilt” quilt:

MQG Show and mug rug display

The show is on display through July 25th.  For more pics, check out our guild’s Flickr pool.   Our guild has also been busy making a charity quilt to benefit a local hospice center; the fundraiser is sponsored by our local Harley Davidson dealer, and so our colors for the quilt are “Harley” colors (orange, grey, black)…  here’s my block:

HarleyBlock

It’s looking really good so far, a friend of mine is quilting it for us on her long arm.  I’ll be sure to show you the finished quilt!

Happy Sewing!

Doris

Studio Dreams… or Dream Studio:

I’ve been looking forward to writing this post for a while… with a move to a new home comes a new sewing space (!!), and my sweetie can attest that with every house we looked at, one of the primary considerations for both of us was what space would become my studio space and how functional would it be?  (He’s well conditioned to being the spouse of a quilter and an artist) 😉

Coming from a small, third-floor walk-up, north-facing, condo apartment with very few windows, natural light was a major plus in the house we ended up buying!  The home is 97 years old, not always cared for in the way it should have been, but it was built. like. a. rock.  I kid you not, barring fire or Mother Nature intervening, this place will be standing long after the “constructed in 2003 condo” we moved out of.  Here are a few “before” pics of the room I chose for my studio (a solarium off the entry foyer and across from our living room) with two french doors to close it off:

Before Pics for Studio Redo Quilt Studio

  1. The prior, ill-fitting curtains didn’t really cover the six windows that face the street side of our home
  2. Some of the peeling paint in the ceiling, thankfully not a sign of water infiltration, but of recent neglect
  3. One corner of the ceiling, after my back-breaking weekend of scraping, patching and sanding the ENTIRE surface of the 9′ x 13′ ceiling to cover numerous hairline cracks before priming for painting.
  4. The ceiling finally painted, and moving on to covering up the deep burgundy color with Benjamin Moore’s Fountain Spout.

Move-in day came almost three weeks after our date of possession; we did a lot of cleaning, fixing, painting, etc. on the evenings and weekends leading up to it.  But all that has paid off.  So… on to the “after” photos!

This is what you see as you enter through the french doors (photographed before my new curtains were hung!):

Quilting Sewing Studio Full Shot

And the rest of that wall of windows…

Quilting Sewing Studio North Wall

And on the other side of the cutting table:

Quilting Sewing Studio Front Corner

This corner is a favorite spot of my two furry sewing buddies — they take turns as sentry, keeping an eye on the whole neighborhood from here:

Sewing Quilting Studio Windowseat for cat

Maggy on sewing Quilting Studio windowseat for cats

And in the opposite corner, behind my sewing chair, is the bulk of “my fabric collection” (still organized by the same system I explained in this post) stored in basket-drawers and a bathroom shelf unit:

Sewing Quilting Studio Stash Fabric Storage

  • Shorter set of shelves are the (sadly, now-hard-to-find) Ikea Antonius storage baskets (one of these frames broke in the move and were replaced with the two white frames on the right).  I was told they are being phased out in favor of the Ikea Algot system. Bummer.
  • Wall unit was a freebie from a friend, OLD Eddie Bauer Home bathroom storage unit (it fits FQs and Charm Packs perfectly!)
  • Pillow by Jill, that makes me smile every time I look at it!
  • Sewing Quilting Studio Paper Pieced House Pillow Detail

This tool cart, a very recent purchase, is fabulous, I can take my supplies with me to the living room, the dining room table, across the sewing room…

Ikea Raskog Sewing Quilting Studio Cart

  • Ikea Raskog cart holds my scissors, rotary cutters, pens, pencils, notions, needles, spray starch, pins, pre-cuts, binding clips, hand-sewing tools, etc.

Above my drop-in sewing table, that holds my Janome Horizon is book and magazine storage, a DVD player used primarily for listening to books on CD while I sew, jars of buttons, wooden spools, leftover binding strips… and all my “happy” decorations up on top!

Studio1

StudioDetail3

Mini sewing machine from my childhood dollhouse, Jim Shore sewing machine box from a friend

StudioDetail2

A favorite artist’s print, two teacups from my childhood, my mom’s old oil paint box, a fabric postcard from Annie and some vintage goodies

StudioDetail4

The accessories for my Singer 221 Featherweight, my Grandma’s spool collection, a Charles Rennie Mackintosh mug from a trip to Scotland

StudioDetail1

My “Quilt” metal cutout, purchased from here, a giant button from Hobby Lobby, Amy Butler thread, a laser-cut box made by my sister-in-law, and my most recent sewing machine acquisition…

And a finally — the curtains.  There is a LOT of glass in this room, six LARGE windows translates to a LOT of fabric yardage or a “king’s ransom’s worth” of shades or blinds to cover them!  My solution?  Once again, Ikea came to the rescue… several pairs of Vivian curtains from Ikea, with 9″ wide bands of Laurie Wisbrun‘s Perfectly Perched Stacked Chairs (in Celebration color-way) added as an accent provides just the right amount of privacy when drawn closed.  I used the existing metal curtain rods, but spray-painted them red to match my floor lamp.
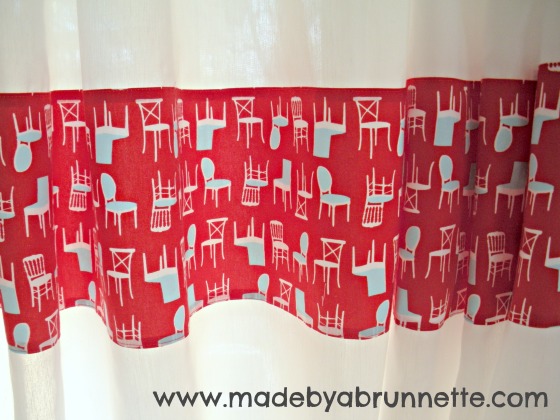
Laurie Wisbrun Tufted Tweets Chairs Sewing Room Curtains

One of my first loves has always been architecture and interior design, so this fabric is perfect for me!

So, there you are… the grand tour of my sewing/quilting studio!  I hope you enjoyed it.

Happy Sewing,

Doris

Fifteen minutes

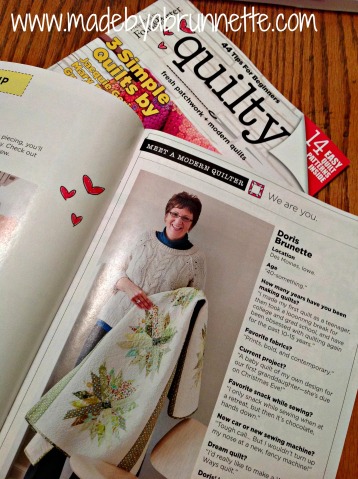
This week brought a fun surprise on page 19 of the latest issue of Quilty magazine (Jan/Feb issue):

Quilty magazine 1

The second “n” was left out of my last name, but that’s me! (It’s spelled right in the URL at the bottom of the page so that’s what matters, right?!)

I had a few emails asking about the quilt I’m holding in the photo; I did show it once here on the blog, but the photos were not great (taken quickly before the quilt was gifted).  Since I borrowed it back for the photo shoot, I took the opportunity to snap a few better pics…
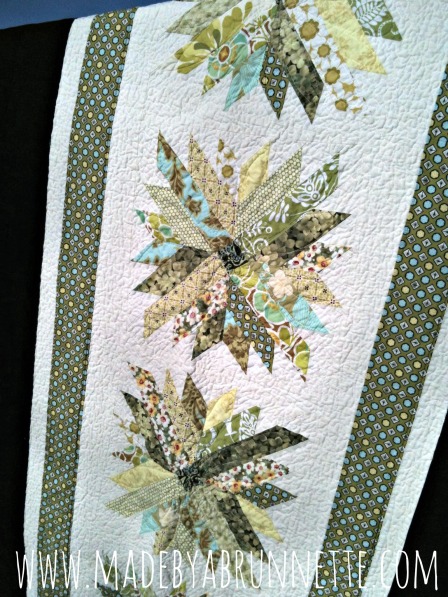
Chrysanthemum Quilt

ChrysanthemumQuiltDetail1

Chrysanthemum Quilt 2

Chrysanthemum Quilt Detail 2

It’s a traditional block, Chrysanthemum, in scraps of greens, border is an Erin McMorris print, and Espresso Brown solid on outer borders.  Yes, it is on the list for making into a pattern for Row House Creations.

This weekend, the Des Moines MQG had a sewing day, 12 uninterrupted hours to sew… heavenly!  I worked on quilting a table runner that has been pieced since JULY– it’s still not completely quilted, but I made good progress.  And I made a new ironing board cover, with a simple elastic casing to hold it on:

Ironing Board Cover Elastic Cut & Sew Fabric

And I just happened to find this matching pincushion on a quick run to JoAnns (could not resist!):

Ironing Board and Chair Pincushion Cut & Sew fabric

I’m such a fan of that Cut & Sew fabric line, it’s adorable and the colors are yummy.

One of my sewing goals for 2013 is stash reduction, and this project helped use a little of it up!  So far this year, I have only bought one charm pack (Posy by Aneela Hoey) and I have used 5 yards for a quilt back that went to the longarm quilter last week, and 1.66 yards for this project (to get the length of the ironing board, with some obvious waste that went to the scrap basket).

Stash Stats year-to-date:

Acquired — .75 yards

Used — 6.66 yards

-5.91 yards