If you can’t find what you want…

…make it!  I’m a DIY kind of girl, always have been. I’m frugal, and learned many skills from my mom; ours was a big family with a limited income, she made do, did a lot of the projects around the house, figured out how to fix things herself. I still tend to do things myself rather than pay someone to do it. Last weekend, I tore the mantle and fireplace surround (with trim all the way to the high ceiling) off my fireplace by myself rather than pay the contractor to do it. Last Fall, when I moved, I wanted a jewelry case to hang in my walk-in closet, that would protect my silver pieces from tarnishing. There are lots on the market, but they were not for my frugal self. And, I decided I didn’t need a large one.

So, I went to Hobby Lobby, bought a 10″ x 20″ shadow box frame, and pulled out the poorly installed canvas backing. I couldn’t find a white frame, so I bought a black one and spray painted it with white enamel that I happened to have on hand. I didn’t take the glass out, I just very carefully taped newspaper over both sides of the glass.

Cut a piece of mat board to fit, and covered that in batting and fabric to match my paint color:JewelryCase1 First, folded in and glued the batting…JewelryCase2 Then did the same with the fabric. The front side looked like this when I was done:JewelryCase3 I glued this into the bottom/back of the shadow box, then drilled holes for cup hooks that I had also spray painted white. (If I were to do this again, I would have used an awl to make my pilot holes–the drill bit got wrapped in batting each time and was a bit of a pain):JewelryCase4 Once the cup hooks were all screwed in:JewelryCase5 And voila! The finished project hanging on the wall of my closet:

JewelryCase6 The wire rack below it is what I have used for years for my necklaces/chains, but anything silver always tarnished quickly hanging out in the open air. Really, a fairly easy project that cost me about $22 total. JewelryCase7Now to get that fireplace surround re-done…

Happy creating,

Doris

From dinosaur to…

…possibly the cutest “up-cycle” project I’ve ever completed.

Over a year ago, I was trying to help my mom sell an entertainment center via craigslist and Facebook. It didn’t fit her new television, so it had been moved to her garage. Well, we couldn’t sell it, we couldn’t even give it away — literally — our local salvage/resale shops won’t take them. So, it became a dinosaur taking up space in my mom’s garage.

But then I saw this, the piece in the before pic is almost an EXACT version of my mom’s dinosaur, shown here:

EntertainmentCenterI sent the pin to my sister and a plan was hatched.

Just before Christmas, we moved the entertainment center from mom’s garage to my garage, and we started painting and remaking it as a surprise for my niece.  We had a lot of fun brainstorming ideas… the sink is a cheap plastic mixing bowl, the faucet is the top of an m&m candy cane that we spray painted, the oven “rack” is a shelf organizer, the burners and stove and faucet knobs are all from the unfinished wood aisle at Hobby Lobby. We used leftover paint from other projects, and  bought kitchen cabinet knobs to use as handles. The inside of the fridge is painted all white, and the shelves are repurposed as refrigerator shelves. The investment in this project in terms of dollars was pretty small.

CollageForBlogWe cut a piece of MDF for the “wall” of the kitchen, my sister didn’t want a cut out (like the Pinterest piece had) in it since it would sit up against the wall in their play area, so I painted an outdoor scene, blue sky with fluffy clouds, flowers and a bunny in the yard, framed it out with 1/2″ trim board for window “mullions”. I also painted a grocery list on the “fridge” door, and a kitty and puppy magnet. (Her grocery list reads milk, juice, candy, bacon — likely a list Zoe would come up with if you asked her what we should buy at the grocery store!)

ZoeKitchen3I made a valance for her “window” out of this yellow Sunkissed fabric by Sweetwater, and trimmed the wash clothes my sister bought for “towels” in the same. The “towel ring” is a plastic scarf ring from Target that I made a little leather holder for. We added cup rings to the opposite wall to hold her utensils.

ZoeKitchen2

ZoeKitchen1We moved it fro my garage, over to my sister’s basement play area on New Year’s weekend, while Zoe was napping. When we had it moved it, I went into her room to wake her up, and I carried her downstairs to see her surprise and she woke up in a BIG hurry when she saw it! (Her brothers were just as excited) A few weeks later, I finished the little apron I made her to match–once she tried it on, she wore it the rest of the day!

ZoeApronCollageShe loves her kitchen, our mom loves that it’s not sitting in her garage anymore, and I love that we didn’t have to send it to the landfill. Win-win.

Happy creating,

Doris

Studio Dreams… or Dream Studio:

I’ve been looking forward to writing this post for a while… with a move to a new home comes a new sewing space (!!), and my sweetie can attest that with every house we looked at, one of the primary considerations for both of us was what space would become my studio space and how functional would it be?  (He’s well conditioned to being the spouse of a quilter and an artist) 😉

Coming from a small, third-floor walk-up, north-facing, condo apartment with very few windows, natural light was a major plus in the house we ended up buying!  The home is 97 years old, not always cared for in the way it should have been, but it was built. like. a. rock.  I kid you not, barring fire or Mother Nature intervening, this place will be standing long after the “constructed in 2003 condo” we moved out of.  Here are a few “before” pics of the room I chose for my studio (a solarium off the entry foyer and across from our living room) with two french doors to close it off:

Before Pics for Studio Redo Quilt Studio

  1. The prior, ill-fitting curtains didn’t really cover the six windows that face the street side of our home
  2. Some of the peeling paint in the ceiling, thankfully not a sign of water infiltration, but of recent neglect
  3. One corner of the ceiling, after my back-breaking weekend of scraping, patching and sanding the ENTIRE surface of the 9′ x 13′ ceiling to cover numerous hairline cracks before priming for painting.
  4. The ceiling finally painted, and moving on to covering up the deep burgundy color with Benjamin Moore’s Fountain Spout.

Move-in day came almost three weeks after our date of possession; we did a lot of cleaning, fixing, painting, etc. on the evenings and weekends leading up to it.  But all that has paid off.  So… on to the “after” photos!

This is what you see as you enter through the french doors (photographed before my new curtains were hung!):

Quilting Sewing Studio Full Shot

And the rest of that wall of windows…

Quilting Sewing Studio North Wall

And on the other side of the cutting table:

Quilting Sewing Studio Front Corner

This corner is a favorite spot of my two furry sewing buddies — they take turns as sentry, keeping an eye on the whole neighborhood from here:

Sewing Quilting Studio Windowseat for cat

Maggy on sewing Quilting Studio windowseat for cats

And in the opposite corner, behind my sewing chair, is the bulk of “my fabric collection” (still organized by the same system I explained in this post) stored in basket-drawers and a bathroom shelf unit:

Sewing Quilting Studio Stash Fabric Storage

  • Shorter set of shelves are the (sadly, now-hard-to-find) Ikea Antonius storage baskets (one of these frames broke in the move and were replaced with the two white frames on the right).  I was told they are being phased out in favor of the Ikea Algot system. Bummer.
  • Wall unit was a freebie from a friend, OLD Eddie Bauer Home bathroom storage unit (it fits FQs and Charm Packs perfectly!)
  • Pillow by Jill, that makes me smile every time I look at it!
  • Sewing Quilting Studio Paper Pieced House Pillow Detail

This tool cart, a very recent purchase, is fabulous, I can take my supplies with me to the living room, the dining room table, across the sewing room…

Ikea Raskog Sewing Quilting Studio Cart

  • Ikea Raskog cart holds my scissors, rotary cutters, pens, pencils, notions, needles, spray starch, pins, pre-cuts, binding clips, hand-sewing tools, etc.

Above my drop-in sewing table, that holds my Janome Horizon is book and magazine storage, a DVD player used primarily for listening to books on CD while I sew, jars of buttons, wooden spools, leftover binding strips… and all my “happy” decorations up on top!

Studio1

StudioDetail3

Mini sewing machine from my childhood dollhouse, Jim Shore sewing machine box from a friend

StudioDetail2

A favorite artist’s print, two teacups from my childhood, my mom’s old oil paint box, a fabric postcard from Annie and some vintage goodies

StudioDetail4

The accessories for my Singer 221 Featherweight, my Grandma’s spool collection, a Charles Rennie Mackintosh mug from a trip to Scotland

StudioDetail1

My “Quilt” metal cutout, purchased from here, a giant button from Hobby Lobby, Amy Butler thread, a laser-cut box made by my sister-in-law, and my most recent sewing machine acquisition…

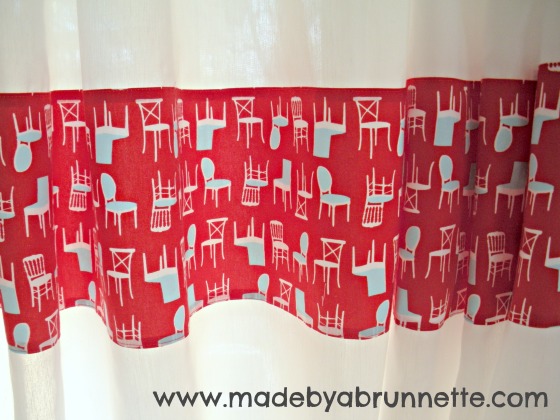
And a finally — the curtains.  There is a LOT of glass in this room, six LARGE windows translates to a LOT of fabric yardage or a “king’s ransom’s worth” of shades or blinds to cover them!  My solution?  Once again, Ikea came to the rescue… several pairs of Vivian curtains from Ikea, with 9″ wide bands of Laurie Wisbrun‘s Perfectly Perched Stacked Chairs (in Celebration color-way) added as an accent provides just the right amount of privacy when drawn closed.  I used the existing metal curtain rods, but spray-painted them red to match my floor lamp.

Laurie Wisbrun Tufted Tweets Chairs Sewing Room Curtains

One of my first loves has always been architecture and interior design, so this fabric is perfect for me!

So, there you are… the grand tour of my sewing/quilting studio!  I hope you enjoyed it.

Happy Sewing,

Doris

Holy Masquerade, Batman!

BLOGTOBERFEST, Day 27

(That’s an actual Robin quote, btw)  So, the big reveal… no one got both correct, but it would have been an impressive guess if you had–

We were the Joker and Catwoman (based on the 1966 television portrayals by Cesar Romero and Julie Newmar).  The originals:

and us, as Joker and Catwoman:

And yes, I made the costumes.  How?  It started with a trip to Goodwill where we bought:

And then a stop into the supermarket two doors down from Goodwill to buy some Rit Fabric Dye (the green dye was intended for Joker’s shirt, but we ended up not using it):

I started by washing everything, the Linen capri & blouse set and the green shirt were washed in a bath of Color Remover (which didn’t really do a thing); then I soaked the linen set in the purple dye for several hours (washing machine method).  After it dried, the color was very uneven, but I got to work anyway.

I removed the short sleeves from the linen blouse, cut long sleeves from the capri pants legs, and attached the new sleeves to the jacket.  Then I cut the bottom of the blouse off, made a pointed hem on each side in the front, and added tails to the jacket (which you cannot see in the pics, sadly)–so it looked just like The Joker’s tuxedo jacket. From the scraps of fabric I had removed from the blouse and the leftovers from the pant legs, I made a collar and lapel and attached them to finish the jacket.

THEN… sweetie went back to the supermarket to buy another box of purple dye, and we did the dye bath again, this time on the stovetop–worked great, we got a good solid cover of vibrant purple!  The only problem was, I hadn’t reinforced my seams and the linen blend raveled like crazy and I had to re-sew. every. single. seam.  Ugh.  Disaster averted–one purple Joker dinner jacket complete.  We decided the shirt wouldn’t take the dye anyway, because of the sateen finish, so we left it as is.  Same with the pants, they fit perfectly. Win! I did his makeup, which made the costume, I think:

On to Catwoman.  I cut the bottom of the dress off, removed the belt loops, and attached the “leather” belt at hip level to create the Mod-look 1960s “catsuit”.  The sleeves required slight adjustments to make it fit more closely — maybe a half hour sewing time, tops.  Add to that a pair of black leggings and boots from my closet, and I bought a long red wig at Target for $8.00, and the cat ears and mask from our theatrical shop (painted the mask with black glitter paint and it was good to go), added elbow length black satin gloves, and a necklace from my jewelry box, and voila!

To finish off the Joker costume, we purchased green hair paint and re-painted a wig from last Halloween, and bought bright purple gloves.  I cut the hem from the black dress I cut up for my Catwoman top, and tied it on him for his necktie.

DIY Woes

BLOGTOBERFEST, Day 9

Today is my lovely Momma’s 75th birthday!  This Spring, she sold her house in my hometown (about 120 miles from where I live)  and moved into a retirement town home community in a suburb of Des Moines (yay!).  Having her living locally, close to her three youngest children, and five of grandchildren, is wonderful.  She babysits when needed for my brother and sister (happily and willingly!), attends soccer and football games and practices, joins them for a quick trip out for ice cream; even joined me on Friday for her first AQS experience!  When she needed new eyeglasses, I just took a long lunch to go help her pick out a new pair.  Yesterday, she drove over and took my little sister out for lunch for HER birthday.  Mom has been very happy she made the move, despite missing her old friends, and we’re happy to say she’s made new friends fast.

HAPPY BIRTHDAY, MOMMA!!!

(Click on the photo to go to the designer’s site–love her Cake Walk pattern!)  My sweetie and I fixed up a new sewing table for Mom’s Elna sewing machine as a birthday present.  She sews with an Elna 6003, but she’s never had a drop-in table for it.  It must have been six years ago that she and I bought a nice unfinished wood shelf/tabletop at Menards with the plan that I would help her turn her old treadle sewing machine base into a custom made drop-in table for the Elna.  Well, best laid plans…

After her move in June, my sweetie and I took some measurements, drew up a plan, realized that the treadle sewing machine base wasn’t wide enough to accomodate her sewing machine, but thought we might have a table base in the garage that would work… so we hauled the wood tabletop home with us.

I dusted off my old jigsaw, and cut the hole out for her machine and the plexiglas extension base she had, borrowed my little brother’s router, and my sweetie routed out a nice shallow lip for the plexi to rest on.  The table base that we had fit perfectly.  It came from a little drop-leaf kitchen table that I found at an estate sale and had started to strip the paint off but gave up after we found another small table that needed no work and fit our space perfectly–and it was only $25 (with chairs).  Sweetie wanted to throw the little half-stripped table away, but I wouldn’t let him.  “It’s a perfectly good table, and someone will be able to use it.  It doesn’t need to be in the landfill”.  Yep, I’m that girl.

So, the table base was attached to the bottom of the new custom-cut table top, and a rectangular base for the sewing machine to sit on was suspended from the bottom of the tabletop:

We used an enamel spray paint for the base and legs, and bought a quart of the worst.oil.based.enamel.paint.ever.made. to paint the top a nice smooth, glossy finish.  I’m telling you, this project would have been complete in July if not for this horrible paint.  It went on like glue (and stated very plainly on the label that IT WAS NOT TO BE THINNED).  Not only that, it didn’t really dry, either.  My sweetie is far more patient that I; if I had been the one working on painting this, I would have stripped the first layer off after waiting a week for it to dry completely, and immediately thinned the paint and recoated it a few times–project complete.  But– he was determined not to be defeated by this can of paint (although he threatened about three weeks ago to go throw the entire table away and start over).  I’m pretty sure you know what my answer to that was.

Last week, when he was out of town for work, and we had some warm weather days, I went out to the garage to re-coat it.  He had painted a coat on Saturday morning, and this was Tuesday evening and it was still tacky.  I picked up a scraper and started scraping the edges down, so he could re-sand it, and maybe buy new paint and get the crazy thing done before her birthday.  When he saw what I did, he scraped it the rest of the way, sanded like crazy, thinned the paint and painted a new base coat.  The next day, he painted a second coat on it.  Third day, he did a little touch up, and this weekend we were able to declare this never-ending-project completely done.  Lesson learned: next time, just go buy different brand of paint.  Here is the table sans sewing machine and plexi (I’ll post a pretty pic complete with her set-up after we make the delivery tonight!):

Given the hours we invested in this project, we would have been much further ahead if we had just gone here and purchased a new table for her (but, don’t tell my sweetie I said that).

**UPDATE:  Table has been delivered, it’s a perfect fit and Mom can get back to sewing!  Here is a shot showing the groove we cut out for the plexiglas extension bed, and the whole set-to with her Elna Quilters Dream 6003 machine in place:

Now, if I could just get that table runner made for her that I promised her over two months ago…

Tutorial: Ironing BIG Board

At our house, my sweetie irons. I do. not. iron. clothes. (unless I absolutely have to–say, when he is out of town). But, pressing fabric and seams is a part of quilting and sewing, and I have no problem with pressing. It’s ironing that I loathe. Who’s with me here?!?

Anyway, I’ve never particularly liked pressing fabric on a traditional ironing board; that tapered/pointed end is counter-productive. So I made myself a Big Board:

First, I bought a piece of MDF, and cut it to 17″ x 48″.

Then, I covered it with Bo-Nash Ironslide 2000 (if you don’t have this on your pressing station, do yourself a favor and get it!  You can thank me later).  This comes 19″ wide, hence why my board is cut to 17″.  The IronSlide 2000 was attached to the MDF with it’s self stick backing (you could reinforce it with double stick tape, if desired).

Finally, I wrapped it with a piece of 54″ wide “PURE” canvas, by Sweetwater for Moda.  This is then stapled into the MDF from the backside.  I posted in detail here how I do this “wrap and staple step” to get a nice clean edge and tight corners.

The BIG Board sits atop the traditional ironing board, and greatly increases your surface area for pressing.

Here’s the finished product, modeled by my sweetie pressing a fat quarter, ’cause sometimes he does that for me, too.  😉