A ghastlie reunion

**If you’re visiting from the Bloggers Quilt Festival, be sure to scroll down, my quilt entry is two-sided, and you don’t want to miss the back!

When we (Row House Creations) designed our Mums for Melissa pattern, I knew I had finally found the perfect design to use my (ahem. cough) collection of Alexander Henry Ghastlies fabrics! I think the first collection was released in 2009; sort of a unique, “Addams family” style novelty print. This pattern is designed to use a 2-yard cut of a print fabric that you can’t bear to cut up too small:

mums_frontcopyThe characters in the Ghastlies fabrics are so detailed and have such great expressions, backgrounds and “props” that they need to be used in larger pieces. I did make placemats with them a few years ago, and I made the quilt top I shared on our Row House Creations site in 2013. Trina quilted it for me in 2014, but I realized I never blogged about the finished quilt. Because, you know, 2014 was my worst year. Ever.

But it did get quilted, and it’s pretty awesome (if I do say so myself), because it’s two-sided, and the back is fabulous, too. This is a full shot of the front:

MFMGhastlies1

The “mums” in the center panel include some Ghastlies coordinates, but also just grey, black, pink, and lavender prints from my stash that coordinate well; the center is a dark green tangled lace Ghastlies print. It’s easy to see my fabrics in this photo from before it was quilted:

GhastliesMFMDetail3And the inner border is from a line by Sanae for Mode called Haunted Mansion (I love this print) and looks like a damask wallpaper print complete with spider medallions:

GhastliesMFMdetail5

The quilting is done on an Innova long-arm, using their computerized designs, but in a custom manner (a different design for the center flowers, the inner borders and the large side panels of the quilt):

MFMGhastlies5

MFMGhastlies4I had a TON of fun making this quilt, I’m a bit crazy for Halloween, I love these fabrics, and I was using a pattern my business parter and I had designed. My fun didn’t stop with the quilt top. The back I had just as much fun making, creating a family “photo gallery” and a wainscoting wall look using some Tula Pink Nightshade fabric that coordinates with this collection very well, and the original Ghastlies, the Ghastlie Family Reunion and Ghastlie Gallery collections:

MFMGhastliesBack1

I started by fussy-cutting scenes from the large prints of each collection and “framing” them in coordinating fabric:MFMGhastliesBack4

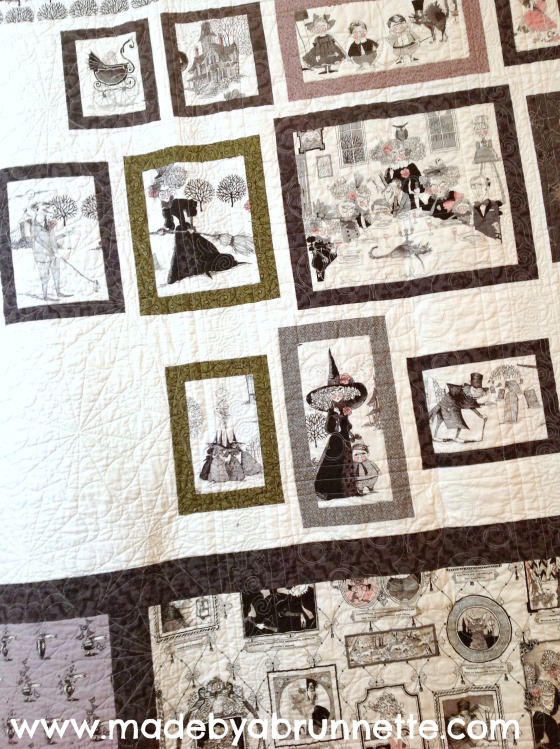
I arranged them in rows on my design wall, added the white “wall” around them, then added the “wainscoting” panel below and above the photo gallery:

MFMGhastliesBack3

MFMGhastliesBack2The photo gallery inspiration came from this print from a Ghastlie GalleryMFMGhastliesBack5One of my very favorite quilts–this one stays with me! BTW, the back is a one-of-a-kind design and is NOT a pattern and NOT included in our Mums for Melissa pattern.

This is my entry in the Spring 2015 Blogger’s Quilt Festival — entered into “original design” category — would love to have you vote for me for viewer’s choice!

Happy Quilting, and come back again,

Doris

How did I miss October?!?

Well, I didn’t miss it completely, just blogging during October — but this Autumn just got too crazy, and something had to give. I did sew though, a few costumes… this adorable penguin costume for my niece (you might recall I made her very first Halloween costume in 2011):

103013_Zoe3

The hat was actually purchased, because her Mommy found it under $10. And it’s hard to see, but I made a pillowy fleece & flannel body with black “wing” flaps that attached around her wrist with thin black elastic. She was specific about being a girl penguin (Girl has two big brothers, y’know) so Mom lent her a string of pearls and added a pink flower pin to her hat. Crazy adorable.

Handmade Penguin halloween Costume

And you can almost see it in that photo (she was too excited to stand still!) the Trick-or-Treat bags that I made for her and her brothers:

Trick or Treat Bags Panel

They were a panel I bought a few years ago, and I liked the retro images so much, I almost made myself a table runner out of them instead! 😉 We spent a fun evening with the Lioness granddaughter at Living History Farms Family Halloween (Lion costume from Pottery Barn Kids):

Lion Halloween GemmaIf you’ve been reading this blog for any amount of time, you know I love Halloween and I love creative costumes. Have to share one last pic that shows the great robot costumes my sister created for her boys (the penguin’s big brothers):

Kids Trick 0r Treating

until next October…

What a Tangled Web We Weave – Spiderweb Block Tutorial

BLOGTOBERFEST, Day 31

Today is the last day of Blogtoberfest, and my day on the Wicked Blog Hop.  Also joining in on Bloggers Quilt Festival with this fun Halloween quilt!

My “wicked” quilt block is the spiderweb block used to make my What a Tangled Web We Weave quilt, which received an honorable mention in the Des Moines Area Quilters Guild show this October.

The finished size of the quilt is Twin Size, and it takes 20 spiderweb blocks.  Here it is spread out on our Queen Size bed:

To make the blocks:

  •  Cut randomly sized strips of fabric across grain by width of fabric (wof) and sew into strip sets at least 6 1/2 ” wide.  (for one block you will need 1 or 2 strip sets, for the Twin size quilt you will need 18-20 strip sets)
  • Using a 60-degree ruler, cut alternating triangles from your strips sets in this fashion:

  • From background fabric, cut one 5 7/8″ square, cut in half diagonally into two half-square B triangles.
  • Also, from background fabric cut two A template pieces, and two Ar (A-Reverse) template pieces.  Template is provided here: SpiderwebTemplate
  • Add a B triangle to the flat end of two of your strip wedges, and add two A triangles and two Ar triangles to the flat ends of your other strip wedges like this:
  • Sew three wedge pieces together to create half a block; repeat:
  • Join your two half block pieces together and then square your block:

I fussy cut the inner border from a stripe fabric, it reads “Halloween” over and over…

And the outer border is an Alexander Henry fabric (from 2006, I think) called “Halloween Lane”.  And the backing is another fun Alexander Henry print called “Unhappy Hour”…

Trina’s long arm quilting made the quilt…the spider web details are fantastic, and I adore the cluster of spiders in the square areas of the background:

Thanks for stopping, I’d love to hear your comments on my quilt… and please go pay a visit to these Wicked Bloggers and see what they have to share today:

Candy Corn Crazy

BLOGTOBERFEST, Day 30

It’s true, October 30th is National Candy Corn Day… I’m not sure why we have National “Days” for everything under the sun, but there it is.  And, I admit it, I have a weakness for this stuff.

Candy corn is a sweet confection, made to look like dried corn kernels. It’s considered a “mellow cream,” a type of candy made from corn syrup and sugar that has a marshmallow-like flavor. Although candy corn tastes rich, it’s actually fat-free.  But keep in mind, that does not mean calorie free!  And if you are like me, one handful is never enough…

There are any number of Candy Corn inspired recipes out there, such as Candy Corn Cheesecake:

Candy Corn fudge:

Candy Corn truffles (which look pretty darned tasty):

There are even recipes online for making your own Candy Corn, though I’m not sure why you would bother when Brach’s does such a wonderful job of it for you.

There is no shortage of candy corn inspired crafts either.  I even posted one of my own last year, a Candy Corn themed favor bag, tutorial here.

I might have to make one of these to celebrate next October 30th:

I’m sure you’re hungry by now so go treat yourself to some Candy Corn in honor of Natioanl Candy Corn Day, October 30, 2012…

God’s Jack

BLOGTOBERFEST, Day 28

Most everyone who knows me, knows I have a thing for Halloween.  But I also have a thing for God.  While I do have fun celebrating a holiday that has pagan origins and ties to the occult — I celebrate it as a time to be a kid again, a time to express creativity, and a time to be silly and be “someone else” for a bit, even if only for a few hours.  Even as a kid and a teenager, I never did anything evil on or around Halloween.  Most people don’t, do they?

One of my favorite emails received (that I repost every year) is this:

It’s called “God’s Jack”


Being a Christian is like being a pumpkin.
God lifts you up, takes you in,
and washes all the dirt off of you.
He opens you up, touches you deep inside
and scoops out all the yucky stuff–
including the seeds of doubt, hate, greed.
Then He carves you a new smiling face
and puts His light inside you to
shine for all the world to see.

If my people, which are called by my name, shall humble themselves, and pray, and seek my face, and turn from their wicked ways; then will I hear from heaven, and will forgive their sin, and will heal their land.  –Chronicles 2: 14

Holy Masquerade, Batman!

BLOGTOBERFEST, Day 27

(That’s an actual Robin quote, btw)  So, the big reveal… no one got both correct, but it would have been an impressive guess if you had–

We were the Joker and Catwoman (based on the 1966 television portrayals by Cesar Romero and Julie Newmar).  The originals:

and us, as Joker and Catwoman:

And yes, I made the costumes.  How?  It started with a trip to Goodwill where we bought:

And then a stop into the supermarket two doors down from Goodwill to buy some Rit Fabric Dye (the green dye was intended for Joker’s shirt, but we ended up not using it):

I started by washing everything, the Linen capri & blouse set and the green shirt were washed in a bath of Color Remover (which didn’t really do a thing); then I soaked the linen set in the purple dye for several hours (washing machine method).  After it dried, the color was very uneven, but I got to work anyway.

I removed the short sleeves from the linen blouse, cut long sleeves from the capri pants legs, and attached the new sleeves to the jacket.  Then I cut the bottom of the blouse off, made a pointed hem on each side in the front, and added tails to the jacket (which you cannot see in the pics, sadly)–so it looked just like The Joker’s tuxedo jacket. From the scraps of fabric I had removed from the blouse and the leftovers from the pant legs, I made a collar and lapel and attached them to finish the jacket.

THEN… sweetie went back to the supermarket to buy another box of purple dye, and we did the dye bath again, this time on the stovetop–worked great, we got a good solid cover of vibrant purple!  The only problem was, I hadn’t reinforced my seams and the linen blend raveled like crazy and I had to re-sew. every. single. seam.  Ugh.  Disaster averted–one purple Joker dinner jacket complete.  We decided the shirt wouldn’t take the dye anyway, because of the sateen finish, so we left it as is.  Same with the pants, they fit perfectly. Win! I did his makeup, which made the costume, I think:

On to Catwoman.  I cut the bottom of the dress off, removed the belt loops, and attached the “leather” belt at hip level to create the Mod-look 1960s “catsuit”.  The sleeves required slight adjustments to make it fit more closely — maybe a half hour sewing time, tops.  Add to that a pair of black leggings and boots from my closet, and I bought a long red wig at Target for $8.00, and the cat ears and mask from our theatrical shop (painted the mask with black glitter paint and it was good to go), added elbow length black satin gloves, and a necklace from my jewelry box, and voila!

To finish off the Joker costume, we purchased green hair paint and re-painted a wig from last Halloween, and bought bright purple gloves.  I cut the hem from the black dress I cut up for my Catwoman top, and tied it on him for his necktie.