100 Happy Days

I started my own version of #100HappyDays in April 2014, just as the shock of losing my husband was starting to wear off and the numbness was replaced by an ache and a pain that would not stop. Everything “normal” I knew was suddenly gone from this world. The #100HappyDays challenge is to post a picture each day for 100 days of something that made you happy. I decided I could do it, despite the fact that I was having trouble seeing anything but my despair–and it could be a tool to help me heal.


So. The challenge. While it might not be a happy day, let’s face it, I had watched Leukemia rob my husband of his good health, his vitality, and his life, in the span of roughly ONE month, I should be able to find joy in at least one thing every day. Something that made me smile through the tears. Something that gave me a feeling of gratefulness despite the hole in my life.

Screen Shot 2

(A few of my #100HappyDays: sewing with friends, tulips for Easter, bouquets from friends for our 3rd Wedding Anniversary, lilacs, gifts from friends, our silly cats…)

Today is Day 43. I haven’t posted yet, but there is a movie night planned at my house tonight and I know I’ll have a GREAT happy post for this evening! Some days have been a challenge. But, I have much to celebrate, much to be grateful for, and yes, even joy in my life despite all that has happened.

Sometimes we believe that we can’t love or enjoy life…or have joy…unless all is right in our life, relationships, and world. But, we have the ability each and every day to choose to love life and enjoy it–to choose joy.

I’m not saying it’s easy. Life knocked me so hard this time–I wasn’t sure I wanted more. Sometimes, the best thing you can choose to do with your day is to get out of bed and put one foot in front of the other. I’ve had many days where I just wanted to pull the quilt up over my head and stay in bed. But I knew Frank would not have wanted me to do that. He found good in every day no matter how challenging it had been. Heck, even as he lay dying in the ICU, he found good in a seriously frustrating situation. He is my best role model in getting myself through the grief and loneliness by smiling despite the pain and sorrow, and finding a little slice of joy.

God’s goodness is always there. It may take training our eyes to see it again but it is always present. I was SO MAD at God for taking him. SO MAD. I was so angry that he made me wait so long to find him, and then took him away before our 3rd Wedding Anniversary. Every time I was out in public, or saw something terrible on the news, I was so upset that he took such a good, true person who made this world a better place for so many people, even strangers, and left terrorists, criminals, and the truly selfish behind.

I was beside myself that God did not answer our heartfelt prayers. Until my  cousin pointed out to me that He did. He just didn’t answer them the way I wanted them answered. He was relieved of his labored breathing and his pain. He was cured of cancer. He did get to leave the ICU and go home. He was made healthy again. This all happened at 9:07 pm on March 15, when our Father came to take him to his Heavenly home. And I was not left alone (which I prayed for OFTEN and begged Frank not to do–leave me alone, that is).  Even though the loneliness is SO pervasive in my life right now… he left me surrounded by family, friends and good people.

Screen Shot 3

(a few more #100HappyDays posts: lunch with my brother & sister, photos from the last family gathering before we knew Frank was sick, Seeing our grandbaby, spending time with friends and family, painting the guest room, playing with fabric…)

I know that God wants to give us all an abundant life, a life filled with His blessings. But, I’m having a hard time accepting losing Frank as a Blessing. However, everything I have read about grief tells me that eventually I will be able to see it that way. We’ll see.

The truest and purest blessing is God Himself. God is bigger and better than anything we might be facing. Choose today to take one baby step at a time to begin to enjoy life once again. Little by little, you’ll get there. I’m trying with this #100HappyDays project, and finding joy and blessings in the day when there is sometimes very little to feel good about.

Praying for Peace & Blessings for you today,

Doris

How I almost ruined, and then saved, a quilt:

Do you pre-wash your fabrics? I used to be a faithful pre-washer, but then pre-cuts entered the picture, and well, you can’t pre-wash a charm pack… so I stopped pre-washing my other fabrics. After the experience I’m sharing with you today, I think I’ll start pre-washing again.

In May, I shared this lovely finish with you:

Love in a Mist Quilt

With the exception of the outer border print, this quilt was made entirely from my scraps and stash (even the fuschia Petal Power piece peeking out from the back was in my stash).  The white background came from my stash and scrap basket. And that is where the crack in the system occurred.  Stick with me…

On our pattern business blog last week, Trina wrote this in regards to using white as a background fabric: This is my word of caution about using white (which I totally love). If you are using white make sure it is the same white, (brand and color) …all white fabric is not created equally… take a look at some aged quilts with an assortment of white fabrics and you will find the whites are not the same color of white & some look transparent. Doris found this out the hard way, with a laundry catastrophe, about three weeks ago. ;-) ”

Yep.

And I know this, and I try to follow this advice.  With this quilt, as I was cutting and sending out scraps to my Bee members to be sewn into blocks, I thought I was cutting all Kona White for the quilt… but I figured, it’s scrappy anyway, it shouldn’t matter. Right?

Then came August 19th. We had had visitors for the weekend and this quilt was on the bed in the guest room; and our cats had slept on it during the day, so I wanted to wash it because it was one of my entires for the Guild Show that will run in conjunction with next week’s American Quilters Society Show in Des Moines.  Later that evening I posted this to facebook:

“I am a Shout Color Catcher disciple; but the ONE time I forget to throw one in the washing machine, I get pink bleed on a quilt. And of course, I didn’t discover this until i pulled it out of the dryer. I’m sick about it. Just ordered Sythrapol Detergent that will be here by the weekend and commenced praying for the miracle this situation will require. Another fabulous Monday.”

Well, as it turned out I DID have one Color Catcher in the load (I found it on the floor later) but I should have had a BOX of them in there!  I can’t believe I didn’t take a picture of PINKness of the quilt, but then again, I was TRAUMATIZED by the whole situation, so maybe I subconsciously chose not to take a photo for posterity sake in case I couldn’t get it out, anyway!  The outer border was VERY pink, and the white was all a little pink looking. So…

  • First I soaked it for a few hours in Norwex detergent, then washed it (LOAD #2).
  • Then I soaked it overnight in Sythrapol, and washed it in hot water (LOAD #3).  Better, but not white, yet.
  • Again I soaked it overnight with Sythrapol, and washed it in hot water (LOAD #4)
  • Then a wash with just cold water and a small amount of diluted bleach (LOAD #5. NOTE: each wash included three color catchers) the pink is nearly gone from the border print.
  • Another soak and wash with diluted bleach and Dawn Dish Soap (LOAD #6)
  • Looks pretty good, so one more wash to rinse whatever detergents are still hanging on in there (LOAD #7).

As you can tell in this pic of the used Color Catchers, there was still pink leeching out after seven washes!

Sythrapol Color Catchers

But, as for the whites, they did not turn “pink” consistently.  Apparently my “Kona White” background included some other whites, or maybe some Kona pieces that were pre-washed as well as some unwashed Kona.  Either way, certain blocks had a VERY pink background.  Most of it is invisible today, unless I point it out to someone.  Which, anyone who reads this and then sees the quilt on display next week in the guild show will be able to spot it.

This is a pic taken last night in our backyard:

After The Rain _ quilt post laudry disaster

Overall, it looks pretty good (crinkly, as it’s been very well-laundered) 😉  But up close, there are a few white patches that still have a slight pink tint:

After The Rain Yellow Block

AfterTheRainRedBlock

One of the tips I got: a long-arm friend of mine, and longtime quilter said she always washes her quilt with Ivory Soap.  It’s pure, no dyes or perfumes, additives.  I think I’ll make that a new practice; as I will going back to pre-washing.  And I’ll continue to use Color Catchers in every load of laundry I do!

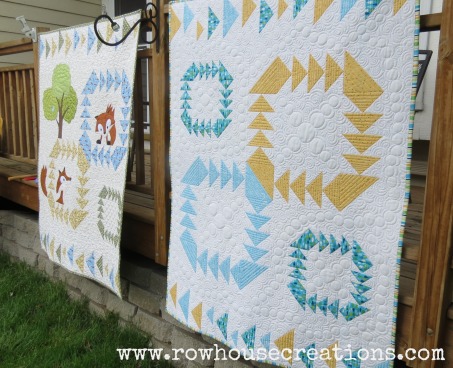
But, I did drop the quilt off last night for our Guild Show, along with two Row House Creations quilts:

Lavender One Big Cabin Girl Quilt Racoon, Owl Squirrel Baby Quilt

Fox in a Box Fox and Geese Applique Quilt

We drop our quilts off at a LQS, this is one side of the room as it looked last night (the last night for entries), there must be 300-400 quilts all tucked away in pillowcases waiting to be hung for display:

AQS Quilt Drop Off

I’m glad I’m not judging them, but it must be a little like Christmas morning to open all of these pillowcases and unfold what’s in them!

Our Des Moines Area Quilters Guild Show runs October 2-5 in conjunction with the AQS Show at the Iowa Events Center in Des Moines, Iowa.

Do you pre-wash?

What do you use to wash your quilts?

Couldn’t Resist Sharing…

As a follow-up to Friday’s post:
1005356_10153118946165594_1871573477_n

Yea, it would be even more hilarious if it weren’t so to the point.  Creatives, Sewists, Quilters, Seamstresses, Designers, Artists (whatever you label yourself):  Value yourself, your time, and your expertise enough to charge appropriately for IT. 

And my sister’s friend sent a photo of her daughter, Amelia, the adorable little recipient of the Lilly Pilly quilt I made:

Amelia and Her Quilt

This was taken after I left their home, when she stopped jumping on the quilt and bed, and was admiring her new treasure.  Makes my heart smile. 🙂

Lilly Pilly Twin – Making a Quilt for a Commission

There are some lovely quilt pics below, but first a few words on how I handle sewing and quilting on commission:

I’ve made quilts for commission before, as well as clothing, sewing alterations, etc; usually for clients I do not know but who find me through word-of-mouth, or a recommendation from the shop where I used to work. The biggest challenge is always trying to estimate one’s man-hours up front.  My advice for calculating your time; break it down into steps of the project. How long you expect it to take you to cut everything out?  How long will it take to piece, how long will basting AND quilting take you (or if you plan to hire a long-armer, find out their cost up-front), and how long to make binding, attach the binding and label the quilt?  Don’t forget any steps as you want to try to estimate your time as closely as you can.  Once you total up your man-hours, decide on an hourly rate for yourself (I use $15, currently, but I may give myself a raise soon as it’s been at $15 for a while now) and multiply that by the total hours.  Then, add 20%.  YES.  Add 20% to the total estimated cost of your labor.  Why? To cover your butt when you grossly underestimate your time; because you will.  We always do.  Now, this doesn’t mean I take advantage of my customers.  On the contract (ALWAYS have a written agreement before you purchase anything) I include a note that labor is estimated to the best of my ability, but should it take less time to make than estimated, the customer will be discounted accordingly.   The client will appreciate the discount, appreciate the clarity and your professionalism, and it’s is always easier to discount something, than it is to go back and ask for more money.

Now, if I make mistakes while working on the project, that cost me time, such as sewing blocks together wrong; that is my mistake, not my customer’s.  Therefore, I do not include un-sewing and re-sewing time as part of my labor cost.   (If I underestimate my time, my customer gets a break because I don’t charge more than my original estimate).

As for materials, my advice is to calculate your materials, at FULL cost (even if you are using your stash, scraps, or sale items) because you should be charging what it would cost to replace those materials for future projects.

So, on to my most recent commission. A friend of my sister’s asked me last Autumn if I would make a quilt for her daughter’s “big girl bed” (a twin size bed she would be moving into this summer). The little girl’s Daddy is an architect and I knew they wanted something modern and contemporary to fit the decor and style of their (very cool) mid-century modern home.  I told her do an image search with her husband on Flickr and Google to find examples of quilts they liked and we would develop an idea for Amelia’s quilt from there.  They did, and they came back with this:

Lilly Pilly Don't Look Now Pattern

They really wanted THIS quilt.  The problem? The pattern makes a quilt that measures 38″ x 51″.  Hardly twin size.  So, my hubby and I went to Kinko’s on a Sunday evening, played around with enlarging the pattern until we got the size I thought I needed; and made a bunch of copies of the appliqué pattern at 183% (or something like that–don’t take my word for it, but if you really want to know the %, email me, I probably have it written down somewhere). And at home, I taped them all together to re-create the appliqué pattern. At the bottom of this pic is the original pattern, and the top is the enlarged version of the same area:

Lilly Pilly Pattern

After tracing my pieces and pressing onto fabric (which I did at one of our MQG Sewing Days), I started working in quadrants, like this:

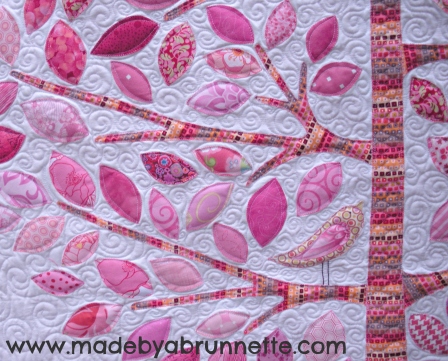
Lilly Pilly Twin Size Tree Applique1

I appliquéd as many pieces as I could while only working with one quarter of the fabric, then I sewed the four pieces together before finishing the appliqué (This made it A LOT easier to maneuver at the sewing machine and minimized my chances of pulling and stretching the design area).

Lilly Pilly Tree applique2

Lilly Pilly Tree Applique

Because this quilt was going to a three-year-old, I didn’t want to have the white fabric along the edge where it will be handled the most; exposed to oils in the skin, etc., so I added a double 4.5″ block patchwork border to finish it:

Lilly PIlly Patchwork Border Detail

At this point, I sent it off to my business partner, Trina, to quilt on her long-arm.  She did a spectacular job, as always…

Lilly Pilly Twin Size Quilt

Love how she finished the tree trunk:

Lilly Pilly Tree Trunk Quilting Detail

Lilly Pilly Twin Size Quilt Back


The backing is a Moda Bella solid but I do not know which color it is.

Lilly PIlly Quilting Detail

Lilly Pilly Quilting Detail

Lilly Pilly Quilting Detail

Each leaf, branch and bird was stitched around a second time with the long-arm to reinforce the appliqué.  I did a little hand embroidery, to give the six little birdies legs and eyes, and I used a pink variegated DMC floss to embroider her name on the label of the quilt:

Quilt Label Embroidered Lilly Pilly Quilt Twin Size

I made two mistakes at the end of this project.  First, I should have added Trina’s name to the label, and secondly, I didn’t pull my phone out to capture the joy Amelia expressed when I delivered this quilt–pure, un-adulterated, three-year-old, jump-on-the-bed, joy.  EVERY handmade gift should be so well received!

Lilly Pilly Quilt On Bed

The bottom line is, if you decide to sell your handmade goods, don’t undervalue your time and your skill.  Contractors are paid well for their skills; as are Electricians, Musicians, Graphic Designers, Woodworkers, Painters… why should handcraft skills be worth less?

Have you ever made a project for hire?

Did you feel you were fairly compensated?

Color quandry

I’ve been preparing to make a purple quilt for a gift, and it’s a bit of a challenge. Purple is the one color I am just not drawn to in fabric (well, that and peach, but I dislike the color peach in all things, not just fabric). So, by preparing, I mean buying fabric in purples because I have very little none in my stockpile of fabric. I was pleasantly surprised when I saw this post today on design sponge, with the color of the day:

coloroftheday_colortext

I was reminded of the significance of the color purple in the Church, and in regards to royalty, because of how rare and expensive the dye was in ancient times.  It is a rich, vibrant color… I just don’t know why I’m not drawn to it.  Purple in the garden?  Adore it!  Photos of fields of lavender have always given me a warm, happy feeling (maybe because I’d love to be there seeing the sight firsthand!):

Deep_Purple_Lavendersource

and in a perennial garden?  Almost a necessity for me! I have crocuses and hyacinth blooming in my yard right now.

purple-crocuses-gold_1488_600x450source

650px-Purple_osteospermumsource

Those are some lovely petals, right?! And my favorite Spring buds?  Lilacs:

lilacssource

I had a part in making this gorgeous purple and grey quilt, and I even had a hard time parting with it!

meredithsquilt4

Yet I have no purple clothing and until some recent online shopping, no purple fabric.  I guess I’m just not drawn to it in textiles.  However, this Tyrian Purple yarn could change my mind, especially when I get around to watching my Craftsy knitting and crocheting classes:

tyrian-purple-yarn-nov-09source

So what’s your color?  The one that just doesn’t draw you in?

What color do you buy the most often (in fabric or other products)?  Mine has to be green, hands down I have more greens and blue-greens (aqua, etc) than any other color of fabric.

I’ll share my purple fabric purchases (and hopefully some purple quilt blocks) soon…

a MUST Read:

My little space here has been quiet for some time; for various reasons. I’m overwhelmed with my job, the business, finding time for family, packing to move, not yet closing on the house we are buying; I’m lucky to get anything finished, much less find time to blog about it.

That, and I’ve become very disenchanted with the internet, social media, etc. in general lately… finding very little of value, and little that lifts my spirit or enhances my day. (In fact, if anything it does exactly the opposite). BUT, this morning I read the best thing I’ve seen online in ages:

It involves this Before and After photos:

SEWING ROOM_BEFORE

EM_SEWING ROOM1_9

Impressive, huh?!  That’s only part of the story… Head over here to read the rest.