Studio Dreams… or Dream Studio:

I’ve been looking forward to writing this post for a while… with a move to a new home comes a new sewing space (!!), and my sweetie can attest that with every house we looked at, one of the primary considerations for both of us was what space would become my studio space and how functional would it be?  (He’s well conditioned to being the spouse of a quilter and an artist) 😉

Coming from a small, third-floor walk-up, north-facing, condo apartment with very few windows, natural light was a major plus in the house we ended up buying!  The home is 97 years old, not always cared for in the way it should have been, but it was built. like. a. rock.  I kid you not, barring fire or Mother Nature intervening, this place will be standing long after the “constructed in 2003 condo” we moved out of.  Here are a few “before” pics of the room I chose for my studio (a solarium off the entry foyer and across from our living room) with two french doors to close it off:

Before Pics for Studio Redo Quilt Studio

  1. The prior, ill-fitting curtains didn’t really cover the six windows that face the street side of our home
  2. Some of the peeling paint in the ceiling, thankfully not a sign of water infiltration, but of recent neglect
  3. One corner of the ceiling, after my back-breaking weekend of scraping, patching and sanding the ENTIRE surface of the 9′ x 13′ ceiling to cover numerous hairline cracks before priming for painting.
  4. The ceiling finally painted, and moving on to covering up the deep burgundy color with Benjamin Moore’s Fountain Spout.

Move-in day came almost three weeks after our date of possession; we did a lot of cleaning, fixing, painting, etc. on the evenings and weekends leading up to it.  But all that has paid off.  So… on to the “after” photos!

This is what you see as you enter through the french doors (photographed before my new curtains were hung!):

Quilting Sewing Studio Full Shot

And the rest of that wall of windows…

Quilting Sewing Studio North Wall

And on the other side of the cutting table:

Quilting Sewing Studio Front Corner

This corner is a favorite spot of my two furry sewing buddies — they take turns as sentry, keeping an eye on the whole neighborhood from here:

Sewing Quilting Studio Windowseat for cat

Maggy on sewing Quilting Studio windowseat for cats

And in the opposite corner, behind my sewing chair, is the bulk of “my fabric collection” (still organized by the same system I explained in this post) stored in basket-drawers and a bathroom shelf unit:

Sewing Quilting Studio Stash Fabric Storage

  • Shorter set of shelves are the (sadly, now-hard-to-find) Ikea Antonius storage baskets (one of these frames broke in the move and were replaced with the two white frames on the right).  I was told they are being phased out in favor of the Ikea Algot system. Bummer.
  • Wall unit was a freebie from a friend, OLD Eddie Bauer Home bathroom storage unit (it fits FQs and Charm Packs perfectly!)
  • Pillow by Jill, that makes me smile every time I look at it!
  • Sewing Quilting Studio Paper Pieced House Pillow Detail

This tool cart, a very recent purchase, is fabulous, I can take my supplies with me to the living room, the dining room table, across the sewing room…

Ikea Raskog Sewing Quilting Studio Cart

  • Ikea Raskog cart holds my scissors, rotary cutters, pens, pencils, notions, needles, spray starch, pins, pre-cuts, binding clips, hand-sewing tools, etc.

Above my drop-in sewing table, that holds my Janome Horizon is book and magazine storage, a DVD player used primarily for listening to books on CD while I sew, jars of buttons, wooden spools, leftover binding strips… and all my “happy” decorations up on top!

Studio1

StudioDetail3

Mini sewing machine from my childhood dollhouse, Jim Shore sewing machine box from a friend

StudioDetail2

A favorite artist’s print, two teacups from my childhood, my mom’s old oil paint box, a fabric postcard from Annie and some vintage goodies

StudioDetail4

The accessories for my Singer 221 Featherweight, my Grandma’s spool collection, a Charles Rennie Mackintosh mug from a trip to Scotland

StudioDetail1

My “Quilt” metal cutout, purchased from here, a giant button from Hobby Lobby, Amy Butler thread, a laser-cut box made by my sister-in-law, and my most recent sewing machine acquisition…

And a finally — the curtains.  There is a LOT of glass in this room, six LARGE windows translates to a LOT of fabric yardage or a “king’s ransom’s worth” of shades or blinds to cover them!  My solution?  Once again, Ikea came to the rescue… several pairs of Vivian curtains from Ikea, with 9″ wide bands of Laurie Wisbrun‘s Perfectly Perched Stacked Chairs (in Celebration color-way) added as an accent provides just the right amount of privacy when drawn closed.  I used the existing metal curtain rods, but spray-painted them red to match my floor lamp.
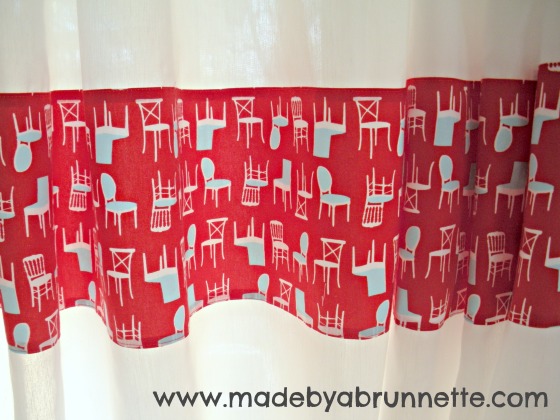
Laurie Wisbrun Tufted Tweets Chairs Sewing Room Curtains

One of my first loves has always been architecture and interior design, so this fabric is perfect for me!

So, there you are… the grand tour of my sewing/quilting studio!  I hope you enjoyed it.

Happy Sewing,

Doris

Sewing Studio Up-Do

(originally posted August 23, 2011)
It’s not really a redo, that was done last year, but this month, it got a definite up-do, or upgrade, anyway, with two great projects!

Today: Project #1, Making a Recessed Sewing Table (a Project ANYONE could do!)

I started with this, my Ikea bookcase and table that I’ve used for sewing for almost two years.

A shot of my studio in June 2010

But when I needed to do any quilting, especially free-motion quilting, I would pull out a little drop center table from JoAnn’s to put my machine in.  However, the Janome was too large to fit into the table from JoAnn’s.  And quilting with the machine too high was just too hard on my neck and shoulders to quilt for very long.  So… I traced the footprint of my Janome onto the table top, and my sweetie got a jigsaw and drill out,

and cut a big hole in the table.  We figured the worse that could happen is that we would ruin a $55 Ikea table, and have to replace it.  The core of the table was a paper cardboard honeycomb core, with two 1x3s running lengthwise for added support…

Sweetie added some more 1×3 strips to enclose the exposed core, added wood filler, sanded, primed, painted and eventually we added this shelf, attached with 4″ L-brackets to the table.  Here it is without the machine sitting in it:

and voila– A recessed sewing table, custom fit for my Janome Horizon! As you can see, there is extra space to the right of machine, that I allowed for access to the power cord, feed dog switch and power switch.  Remember to take that into consideration when determining the footprint of your own machine:

I removed the feet from the plexiglas table that came with my machine and made sure the machine would sit just high enough above the surface of the Ikea table to accommodate it–a perfect fit! If your machine doesn’t have a plexiglas insert, you can have one custom cut at a local hardware store, or glass shop.  Just make sure they have a very accuratetracing of the bed of your machine.

We finished this project on Saturday afternoon, and I spent much of Sunday sewing, it was such a pleasure to have the machine at the correct height for a change!  I think I could sew an entire day without feeling any strain in my shoulders.  A very nice UPGRADE, indeed.

Of course, once we finished I needed to clean the shelves and rearrange everything (sawdust everywhere!) but they needed cleaning and reorganizing anyway.

DIY Tutorials for the other parts of my sewing studio:

Project #2; a sassy new cutting table with storage!

DIY Design Wall anyone can make!

Big Board Ironing Board Tutorial

Fabric Storage (Stash Management)

Easy DIY Design Wall

In all my years of quilting, I’ve only ever used a design wall when sewing at a retreat or a friend’s home.  I’ve often referred to my floor as my “high-falootin’ design wall” here on the blog.  I decided it was about time I had something I could hang blocks and WIPs from to stand back and get a good look at…

To make your own, all you need is:

  • 1-4 pieces of 32″ x 40″ foam core (foamboard) depending on how much wall space you have.
  • 1 yard of white or pale grey cotton flannel (PRE-WASH) per foamboard
  • Duct tape
  • Sticky back velcro (approximately a half yard per board)
  • Kitty to help with the project (optional)

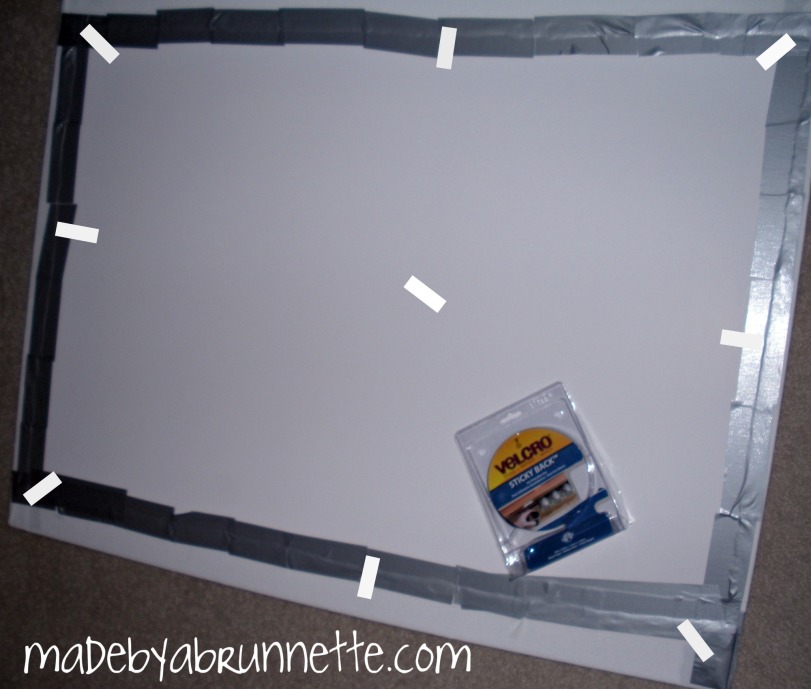
ImageStart by laying a yard of white cotton down on a flat surface, make sure all fuzzies and threads are removed.  Lay the foam core board face down (if one side is smoother or nicer than the other, use that as the face).  Start at two opposite sides, pulling taut and taping edges of flannel around the back side with duct tape, approximately 3″-4″ at a time.  Conitnue to tape these two opposing sides until you get about 2″ from each edge.  At that point, move to the other two opposing sides, and repeat the process. ImageThe corners are finished off by tucking the excess fabric in at a diagonal, just like you do when wrapping a present.  Secure corners well with duct tape.  Cut 9 pieces of sticky-back velcro approximately 2″-3″ long.  Place one at each corner, one at each side center, and one in the middle (use the white rectangles in photo as a placment guide)  When placed, remove the plastic that covers the sticky part, line it up where you want it on your wall or door, and press firmly in place.  (Don’t worry, the adhesive can easily be removed later when you take the boards down with Goo Gone).  Here is my first board finished, attached to a clost door in my studio:

ImageI decided pretty quickly that I was going to need more than one, that wall space to the left of the door is just the right size for a second board… so… before long I had a second board hung and was making good use of it:ImageIt filled fairly quickly with the scrap sewing I was doing last week, these strips are going together with a couple of different projects in mind:ImageI’m so happy to have a space I can just walk away from, leave what I’m working on there, and not have to worry about them being in anyone’s way, cats sleeping on them, etc…

Thanks for finding your way to my new website, I’m working to build the number of followers back up, the soone it gets back over 200, the better the giveaway celebration will be!  Just click “follow” up there at the top…

You can use this link to subscribe to my RSS feed: https://madebyabrunnette.wordpress.com/feed/

Stash Management

Last week’s post led to some great conversation in the comments… the consensus seems to be I’m not the only one who thinks a second or third time before making that fabric purchase now that prices have jumped.

So, next topic: after you acquire it…  how do you organize your stash?  I used to organize mine roughly by color, but always kept dots and stripes separate, and novelties were separate.  I also kept certain designers separate (Amy Butler, Heather Ross, etc…not sure why, I just did)  Yardage and pieces of fabric were all over the place… it really wasn’t working for me anymore.

So, I pulled all of my fabric out of every shoebox, cupboard, wire basket, plastic tub, project bag, and every other hiding place I found (I don’t really hide it from anyone, just sometimes stuff it away to get it out of the way!).  And I started refolding it and sorting it by color…

The living room floor looked like this for quite a few days as I folded, sorted and started to put away.  Anything that wasn’t a quilting cotton (I sew clothing, too) or was truly a vintage piece, went into a separate tub in my studio closet.  The batiks I have also fill a tub, so those were tucked away in the closet, too.  Flannels and fleeces are all together in a storage bag under the guest bed (in my studio).  Everything left was a quilting cotton…

Solids kept separate from the prints seemed to be the right choice for now.

They filled a wire basket by themselves:

I always thought the FQs I kept on the shelf unit above my cutting table were the extent of the FQs in my stash.  Good heavens, was I ever wrong.  I found all of these FQs (mixed in with bigger pieces, most were unfolded so not immediately recognizable as a fat quarter):

That’s nearly 150 FQs there (which nearly doubles the number of FQs I thought I had)!!  They ended up organized by color as well (with some still displayed on the shelf over the cutting table):

So, do you want to see my neatly organized baskets of color?  The WHITES and GREYS

the BLACKS and BROWNS

the REDS

The ORANGES the YELLOWS and the PINKS (and the very few purples I have)

the GREENS (I do love green!!!)….

lots of BLUES and AQUAS


The baskets/drawers go into this metal storage system (Antonius by Ikea), and even though my photo is terrible, it looks so much better that it did before when the baskets were crammed too full, nothing was folded nicely, and my system of sorting had gone out the window months ago (Sorry, I didn’t think to take a “before” pic!).

Everything in the baskets are 2 yard or smaller cuts.  My bigger pieces of yardage are folded uniformly and neatly stacked on a shelf in the closet.  I think I will like being able to see “at a glance” if I have anything in my stash for a quilt back or larger project:

So, there you have it, my stash of fabric and how it is now stored.  So inquiring minds want to know:

  • Do you organize your stash, or is your’s all piled togerther in a box(es) or tub(s) with little to no organization?  
  • Are you one of those “in color order” people like myself, who finds it far more useful and accessible if it’s uber-organized?  
  • Would you rather organize by designer, by style/genre (florals together, 30s together, stripes together, dots together…) 

I really want to know–I’m genuinely curious!

September? Already?!

Today is Fresh Sewing Day over at Lynne’s. Lynne and Gayle are hosting a Hex-A-Long, loosely based on the Candied Hexagon Quilt.  My quilt IS the Candied Hexagon pattern… and this month I made a dozen more blocks:


I’m planning to have this one constructed and quilted by Spring!  (I’d say it’s about time, I first blogged about this quilt in June 2009!)  But, in my defense, I only started cutting the quilt in June 2010!  Every one of those hexagons is hand-pieced… so hand-quilting might be in order for this one…

I finished the top of my Art Gallery Spanish Tiles quilt, which is now quilted and will get bound this weekend:

and most exciting…my studio makeover is now complete!  Recessed sewing table and new worktable projects are done!  You can see the details here and here.

Click here to go visit the other blogs for Fresh Sewing Day.

Sewing Studio Up-Do, Part II

Today’s Studio Upgrade: A New (Inexpensive, Custom) Cutting Table with Storage

I’m known for screeching to a halt to pick up someone’s “trash” from the curb, because I firmly believe that one man’s trash is another (wo)man’s treasure.  (Don’t worry, I’m NOT a hoarder, I either finish the project I envisioned within a year or two, or I find a new home for what I hauled home).

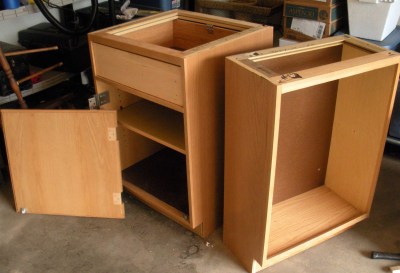
In May, the University I work for was trashing a bunch of old oak cabinets and slate counter tops as  they installed the new chemistry lab.  I happened to drive by that side of campus, the day they were carrying everything out to the curb and setting it near a big sign that said “Free”.  I immediately stopped, pulled two cabinets and some shelves aside with a sign on them that they were claimed and would be picked up later.  I then called my sweetie and arranged for him to swing by on his way home from work that afternoon to retrieve them.  We reluctantly passed on the “too large” slate counter tops.  I brought these home:

My sweetie and I got to work removing vinyl toe kicks, adhesive, sticky messes, etc., then washing,  sanding, priming and painting MANY layers of white paint on these, in addition to cutting new shelves and making minor wood filler repairs.  It’s been an all summer job out in the garage–which sweetie stuck to through our terrible heat and humidity!  (I wimped out once the heat index went over 95 degrees, I was willing to wait until Autumn for my “new” cabinets).

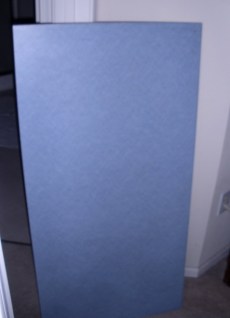
A few weeks later, this old counter top was slated for the trash at the building I work in.  Naturally, I hauled that home, too.  It happened to be just the size I needed to top off the oak cabinets. (Lucky, huh?)

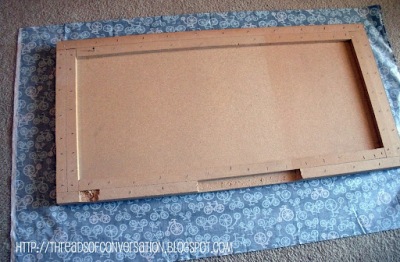
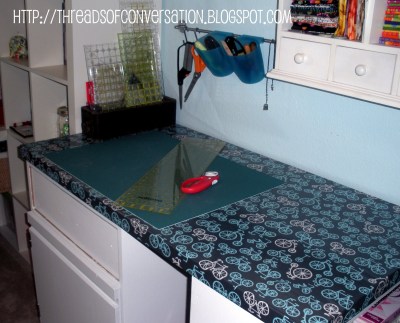
I wasn’t crazy about the 1980s country blue formica, so when I was at Grubers in July, I picked up some fabulous laminated cotton to cover it (Oil Cloth would have been a little more durable, since it’s heavier, but I adored this bicycle/tricycle print by Michael Miller, and since I am the primary user of this tabletop, I know it will be used carefully).  If you are making a similar table covering that will be used by kids, or multiple family members, I’d recommend oilcloth.

How to cover a tabletop:

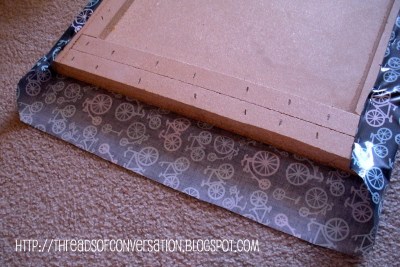
1.  Cut your oilcloth/laminated cotton larger enough to allow for folding over all four sides, with an overlap to the bottom side of your plywood or tabletop, and extra fold under of raw edge–in this case, about 5-6 inches on all sides.  It doesn’t show in this pic, but I trimmed a triangle  (about a 3″ triangle) off all four corners to make easing your corners in in step #5 go smoothly.

2.  Starting at the center of long sides of board, wrap fabric tightly around back, tucking about 1/2″ of raw edge under and securing with a staple gun.  I usually do the center, and about 3″ on each side of center spot along one side, then move to opposite side of the board and repeat by pulling fabric tightly around the back at the center of that side, turning under 1/2″ raw edge again, and securing it with a staple gun.  

3.  Proceed outward along sides of your board, alternating from side to side every so often, until you  reach the end at all four corners. 

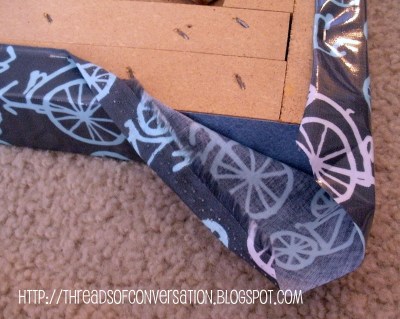
4.  Moving to center of your short ends, repeat step #2, until you get to this point:

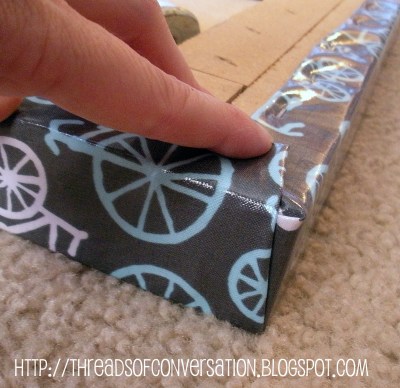
5.  This is where the fact that you trimmed a triangle of bulk out of your corners in step #1 becomes important.  Fold your long side excess length in closely to the edge of the table top, and fold the end side excess in over the top of it, just like you would if you were wrapping a gift with paper (sometimes it helps to have an extra set of hands at this point-one to wrap and hold, the other person to staple):

6.  Once you have it where your want it, laying nice and flat, secure it with your staple gun.  Add extra staples to bottom side fabric edges as needed.  You can use this same method to re-upholster chair seat covers, ottoman covers, you name it.

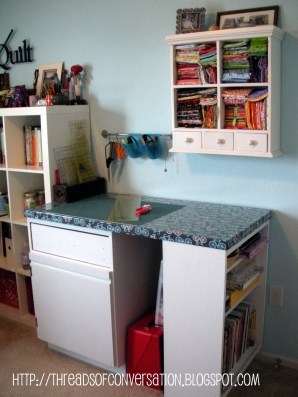
We installed the cabinets and the tabletop in my sewing studio just before we went on vacation…

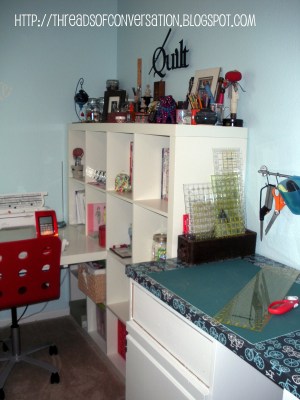
There is an open area under the table that is exactly the width I need for storing my vintage Bernina 830 Record.  The door on the left cabinet hides a multitude of WIP sins… and the open shelves on the smaller cabinet provide storage for books and tools facing the door to the studio…

We also added that nifty towel rod and buckets from Ikea for holding rotary cutters, scissors, seam rippers, pencils, etc.  All at the ready, all off my work surface.  The drawer on the cabinet to the left still needs the drawer facing and pull added to it (This weekend’s project),  but it’s completely functional at this point.  And it’s a HUGE drawer-great storage!

Total Cost for My New Custom Cutting Table/Work Station:

Cabinets & shelving    $0
Formica Tabletop                $0
Laminated Cotton               $17.99 (It took less than a yard so I have pieces left over!)
Primer                                 $10 (we’re giving the rest of the gallon to someone for a second project)
Woodfiller                           $5
Paint                                    $12
TOTAL                              $44.99

I’ve used the cutting top once so far, and it is already worth it’s weight in gold.  A shot of the entire sewing set-up:

Add the ironing board off the left side of the photo there and I have myself a great work-triangle!